In amongst the acres of vintage knitting patterns in the last job lot, I found these:
At first glance I thought they were from the 1970s, but no…
1949 & 1950. Older than me! I can’t resist a vintage recipe, and when I came across this page, being a good West Country girl, I had to try the brownies…
I have to admit to a little bit of doctoring; I don’t have any margarine, so I used butter, which of course would still have been on “ration” in 1950. I doubled up the quantities, realising that the amounts given weren’t likely to feed seven, and I used 4 eggs, as they were bantam eggs. Both sets of my grandparents kept poultry right through WWII and the 50s, as did many, if not most, rural – and some urban – households, so egg-rationing never applied to them. They received poultry feed, which was bulked out with vegetable waste & peelings, instead of shop-bought eggs, and by the end of the War, a quarter of the country’s supply of eggs were home-produced.
And energy use was an issue for our forebears too; I’m afraid I cheated & made the brownies the American way, by melting the butter & sugar together, beating in the chocolate & eggs, then mixing in the other ingredients at the last minute. Much easier on the arms than creaming the butter & sugar, but a few pence more spent on fuel…
But I’m delighted to report that they tasted exactly as I remember brownies at our parish teas, back in the early 60s; much less sugary & gooey than modern ones, but very pleasant in their own distinctively chocolatey, nutty way. I rather think they’d be wonderful warm, with rich West Country cream…
“West Country Chocolate Brownies, from Good Housekeeping’s More Cake Recipes, 1950 – with my own updates/adjustments!
3oz(85g)walnuts
2oz(60g)chocolate
3oz(85g)margarine or lard(I used butter)
2oz(60g)sugar
1 egg(or 2 bantam eggs!)
4oz(115g)flour(I used spelt, which I think is closer to the flour available in the early 1950s)
¼ tsp baking powder
¼ tsp salt
A little milk
Chop the walnuts and melt the chocolate in a basin over a pan of hot water. Cream together the fat and sugar until soft and white, then beat in the egg. Sieve in flour, baking powder and salt and mix well together. Add the nuts and the melted chocolate, and a very little milk to give a soft consistency, Spread into a greased tin and dredge the top with a little sugar.(I forgot this last step, but vouch for it being there in the 60s!) Bake in a moderate oven (350℉/180℃/Gas Mark 5)for ½ hour, or until cooked. Cut into squares while still warm, using a sharp knife, and allow to cool in the pan.
And eat with rich West Country cream…”
Next one up will be the dough cake, which looks suspiciously like Lardy Cake, without lard!
It was quite tempting, this morning, to pull the wool over my my eyes and stay in bed… I have a lovely cosy wool duvet, which has proved to be a sound investment as it’s lasting really well and seems to keep me at the perfect temperature, winter or summer; no mean feat, with a lady of a Certain Age. Anyway, the wind was howling through the holly tree and the rain was hammering against the window panes; not exactly conducive to leaping out of bed with a happy smile and a willing heart.
But rainy days, like the clouds that spawn them, have silver linings. It’s a chance to catch up with some cooking – a batch of hob-nobs, some chicken stock & soup, and an aubergine bake all got done this morning – a little light housework (though it’s far too dark & grim for spring cleaning) and one or two projects that have been sitting on the back-burner for a while.
A number of vintage dressmaking patterns have been checked over before being offered for sale, and my neighbour’s handcranked sewing machine has been sorted out – I hope!
And this sturdy but curious little suitcase had been tripping people up in the conservatory for months. I’m not sure what it originally held – a musical instrument, maybe? – but it had a dark red plush lining, part of which had been ripped out. But I couldn’t help thinking that it would benefit from being introduced to some of the leftover sofa fabric… Result!
Scraps of sofa fabric…
…put to good use!
And here’s my “find” of the week: a set of 5 pristine vintage aluminium pans, most likely from the late 1940s. They came in with a vast collection of old knitting patterns, dating from the 1930s through to the 1970s; it seems from the few letters, etc. amongst them that the lady who collected them got married some time in the 1940s, and these look very much like a wedding present that had been stashed away and never used. They do have all their lids, and were separated by brown paper bags from Bourne & Hollingsworth of Oxford Street, W1.
Swan Brand pans
from the 1940s?
Off now to sort out the best part of 1,000 vintage knitting patterns!
Yesterday Dear Son no. 3 and I swapped him from one of the bigger upstair bedrooms back into the smallest one, the same one he had for a number of years before he went off to university. As he said, it made sense because he’s a minimalist and doesn’t have much “stuff” – oh, and it’s also a fair bit warmer, too!
Whereas I do have rather a lot of stuff… I’d been attempting to use that little room (9′ x 10′ but irregularly shaped) as a guest bedroom, a drying area, and a sewing studio, which had resulted in more or less complete chaos on the sewing side, although it was – just – functional. The drying rack & clean laundry could be swept up & re-deployed at a moment’s notice whenever DS1 came home for the weekend; not so the sewing bench and the vast accumulations of fabric, patterns & notions. To be fair, a large amount of these were things intended for re-sale, that had been deposited in there as a “safe” area to store them in. But they’d got hopelessly muddled up with the bits that I’m actually using or have realistically-achievable plans for…
So now the bigger, cooler room is piled high with bags of fabric, patterns, notions, lace, ribbons, paper etc. I was too tired to try to sort it out, after dismantling two beds, locating a third, and re-building two of them again as well as hauling all the stuff around so it’s still more or less as it was last night; tomorrow I will try to sort out a working area for the big Pfaff, the overlocker and the embellisher, and possibly even add a picture, if I’m brave enough. There are still several trunks full of DD2 & DS2’s belongings in there, too, as well as a “dead” wardrobe (unwanted and unduly rickety now) and the spare bedding! All of which apparently have to go somewhere…
The point of mentioning all this is to say that I have resolved that this will be the year when I buy NO new craft materials or fabric; I already have more than enough, and enough to keep the stall stocked for several months, too. I’m excepting specialist materials like interfacing – although I have a whole roll of heavy sew-in interfacing, found at the Tip late last year – or 505 spray where they’re really needed to do a specific job that actually needs doing & I don’t already have something that I can make do. But no impulse buys, not even when they’re really, really good bargains…
Sorry I’ve been somewhat uncommunicative lately; I’ve had a fair bit on my plate & couldn’t find any time or head-space for writing. But in the meantime I’ve been busy on the recycling/reinventing front: I’m going Glamping on a Shoestring!
I’m old enough to remember camping under canvas. Not family holidays; my dear Mama would die rather than go camping! But Girl Guide trips into the deepest darkest Devonian countryside, sleeping under canvas in blue ridge-tents, with a big white marquee to gather in on rainy days; evenings spent around the campfire, under the trees or on the beach and no access to anything electrical at all! And in my late teens, camping, hiking & canoeing in the wilder parts of Wales & Scotland, often (strangely enough) pitching up in pub gardens & other out-of-the-way spots. So when our kids came along, and several of them proved to be as sunburn-prone & heat-resistant as my dear husband, investing in a tent & camping gear rather than heading straight for the Costas seemed to be the best way forward.
And we did invest; we researched thoroughly & bought what seemed to be the best possible tents etc. for our situation, with the newest technology. And they certainly did last for more than one season; the oldest Khyam dome tent has only just bitten the dust, although we outgrew it fairly quickly. But more recent purchases have not proved as long-lasting, possibly because the younger users have got larger & more boisterous & often take them away without the benefit of parental supervision now. Also I’m no longer comfortable sleeping on the ground, after having had an early hip replacement, particularly not after working a 14-hour day. So as we head up towards the festival season again, I needed to replace some of the gear, and come up with new ways of coping – but on a shoestring. And I also wanted to recapture some of the magic of those long-ago days & nights under quiet, sturdy canvas, after too many nights of billowing, crackling rip-stop nylon, gap-toothed plastic zips & snapping, splintering carbon-fibre poles.
But my budget certainly doesn’t run to buying a bell-tent, lovely though they are. Or a camper van, which I must admit I’d love, though most modern ones seem to come with things like TVs, wardrobes and sound systems, which are the very things I want to get away from! And the running costs are (mostly) too high for them to be used as a second vehicle in regular use, and there isn’t room on the drive for a third vehicle. So I got to thinking, what could I find, make or make-do that might do the job and also delight my heart?
So Project Use-the-Car-as-a-Camper was born. There’s just enough room in the back of a Citroen C4 Grand Picasso for one shortish person to sleep in comfort; the rear seats all fold down flat, giving a 6′ length. We recently “did” the Vintage Nostalgia Show in Wiltshire as traders – lovely show, by the way! Highly recommended for vintage-style family fun – and I slept like a log, knowing that the rain wasn’t going to get in or the sides of the car fall in on me if yet another carbon-fibre pole snapped. I had an old self-inflating mattress and a small memory-foam topper, which was reasonably comfortable, plus sleeping bag, blanket & pillow, and was snug & warm as toast. I kept the morning daylight out by suspending an old dark-blue silk sari with safety-pins from elastic looped around the various protrusions round the top of the car; next time I’ll use a second loop around the door handles etc. to keep it tight to the car walls rather than dangling in my bedding. I’d previously invested in some IKEA Solvinden solar lamps, which give plenty of light for finding your way around, cleaning teeth & getting changed & can be recharged on your dashboard during the day so the battery’s not taking a battering whilst the car is stationary.
What didn’t work: getting changed was a bit of a nightmare with no head-room, particularly trying to get wellies on. And cooking on the tailgate was a bit more complicated than usual; I rolled my bed back out of the way but it wasn’t inclined to stay put! So I invested my profits from that show into buying a tailgate awning to run off the back of the car, which will give us cooking space & me a changing room when we do the next show, which is a 6-day run, with 3 of us camping. But that doesn’t even begin to recapture some of the magic of outdoor living that I remember…
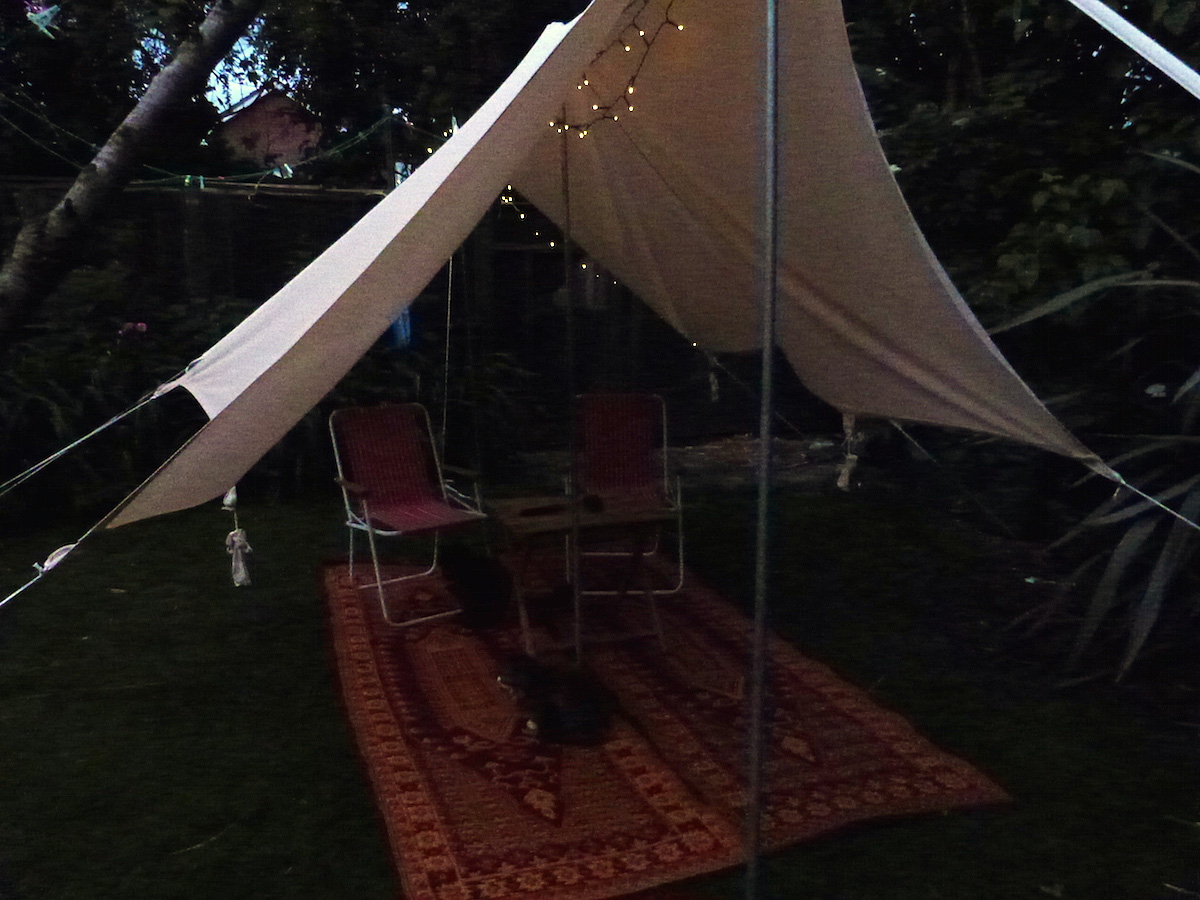
So my next project is – Glamping-on-a-Shoestring! I have “borrowed” an idea from one of my fellow-traders, and bought a straightforward 3m canvas square with loops, which will be used (with guys) to make an outdoor living area; we already have some woven polyprop rugs, solar fairy lights, vintage camping chairs & tables to make it feel homely, and I wombled some tall steel poles from an elderly frame-tent to suspend it from. The tailgate awning and the girls’ two small tents will open into this, and I’ll pop a windbreak round the open sides. And thereby hangs another tale…
Our old windbreak is a bit too far gone to do the job. Somehow it’s shed two of its six poles, and developed several fairly-major holes. But luckily a friend had some spare wooden poles, and I’ve won some rather pretty canvas on Ebay. Now all I need to do is excavate my sewing machine from under the piles of random bits of stock awaiting assessment/repair/cleaning up/…
And although the self-inflating mattress/memory foam combo was comfy enough (if a bit slidey) I think I can do better. I’ve laid my hands on a feather sofa cushion, which is blissfully soft & warm whilst also being thick enough to work as a mini-mattress. I’m on the look-out for two or three more, so that I can literally rest in feather-bedded splendour, but have acquired enough smaller feather scatter cushions to make a mattress up if need be – time allowing!
So watch this space; there will be pictures! And don’t ask what I’m planning to do with the largish bits of canvas left over from the big old frame tent…
If there’s one thing I wouldn’t have expected to spend a significant proportion of today doing, it’s preserving. It’s April; this is supposed to be the Hungry Gap… But what else you do, when a greengrocer hands you a bag of FREE strawberries?!
Still-warm spelt scones, on-its-sell-by cream & freshly-made strawberry jam…
£10 filled my shopping trolley to the brim at lunchtime today, as the market traders prepared to pack down until next Friday; all the stuff that’s not going to last is sold off for 50p, and some of it just gets given away. I’d already bought some strawberries, which are ridiculously cheap at the moment, and various other bargains, and as I packed them into the top of the trolley he just handed me a bag of slightly-battered strawberries with a cheery, “‘Ere, luv, you can ‘ave these too! Use ’em up.”
I didn’t have any pectin, and strawberries aren’t very high in it, so strawberry jam can be a bit of a bu&&er to set. But what I did have was a big bag of apples that I’d picked up cheap two weeks before that I hadn’t got round to doing anything sensible with. So I chopped them roughly, leaving the skin, cores & pips still in, boiled them up & simmered them for half an hour, with the bottom of the pan covered with water & the lid tight on. Then I strained the resulting juice off & crossed my fingers that enough pectin would have migrated into the water to give the strawberries a boost; I actually only used half of it, because that looked like enough. So I chopped the strawberries, removing any rough bits – there was actually very little waste, they were’t very far gone – weighed out the same amount of sugar, poured both into the warm hopefully-pectin-solution along with the juice of a lemon and stirred until the sugar had dissolved. Then whacked the temperature up & boiled until a few drops on a cold plate formed wrinkles when pushed. It DID happen, and it didn’t take too long – success!
It just so happened that instead of my usual scrabble for jam-jars in June, I picked up a big box of 57 pristine, probably brand new, 1lb jars complete with lids at the Tip a couple of weeks ago for £2. I’m assuming that one of the Country Market ladies has sadly given up or passed away, but I’m very happy to be able to use what she’s no further use for. So my usual mad dash around the garage shelves, hunting for enough random-sized jars & matching lids that haven’t gone rusty, wasn’t necessary; I just washed some from the box, rinsed them & popped them into a hot oven to sterilise.
Two and a half jars of strawberry jam made. But what to do with the rest of the pectin-water and the apple pulp? A quick check of the spice cupboard, and I knew I had enough to make some Apple Butter; three and a half jars of it, in fact!
So that’s got the 2015 store cupboard off to a flying start, quite a lot earlier in the year than I can ever remember making jam before. Not that it’ll have to be stored for long; we’re already into the first full jar, having polished off the half-jar! All sorts of things seem to have got off to a flying start this year, with the lovely warm weather we’ve been having. Mid-week I had cause to drive through the middle of our county on the country roads, which I had just about to myself. It was simply stunning; the trees were a symphony of blossom, from clouds of blackthorn through blushing apples to rosy-red hawthorn and cherry-blossom. And underneath the trees, there are still acres of primroses, but also bluebells, not quite in full bloom yet but near enough. I’m not sure I’ve ever seen so much blossom at one time; it’s a fantastic show. The sea was aquamarine & sparkling; if I’d had a camera with me, I’d never have got to my destination!
Looks like I’m going to need a few good quince recipes, too…
Just wanted to wish everyone a happy & well-blessed Christmas, and a chance to rest & put your feet up!
All the candles you see on our festive table have been rescued from our local Tip, aka The Household Recycling Centre, in the last few weeks, most of them completely unburnt & still packaged. They’ve glimmered & danced on our festive table throughout the Christmas feast & are still glowing long into the evening. The flowers were a gift from my cousin, and my lovely Cake Angels come out to play every year. Which is probably very unenterprising of me, but they’re a bit of a tradition now, and certainly less stressy than trying to achieve the perfect icing. There are times when long-established traditions are a welcome framework, rather than a bind, and in the hurly-burly that the modern Christmas has become, it’s nice not to have to innovate & plan ahead, but just to reach for the box of much-loved Christmas ornaments, pop them into place and go off to help Santa with that sherry…
… as they used to say! It’s a looooong story, but for a long time I’ve been saving up for, and agitating for, a stove for the fireplace in the living room. We have lived for long enough with a small 1980s brick-arch fireplace, which wasn’t a terrible eyesore, but really didn’t quite gel with the room. It was a very small opening into quite a large chimney, so created a horrendously cold through-draft, and made a scary loud booming noise whenever the wind outside got up a bit. The energetic draft meant that fires “took” very easily & the flames shot off up the chimney, warming the atmosphere nicely & setting fire to the chimney pot more than once, but doing almost nothing for those of us shivering in the room below. It usually burnt out very quickly, thus necessitating frequent trips to buy wood in winter, even though our garden produces quite a lot.
So a stove seemed like a sensible investment. However it was not a straightforward installation, as the flue bends around a small, now bricked-in, fireplace in the room above, so the liner couldn’t be dropped straight down. And the opening had to be enlarged to something like its original dimensions, or maybe just a bit bigger, as I wanted to be able to pop a kettle and/or casserole dish on the top in case of power cuts, or even just to utilise “free” heat.
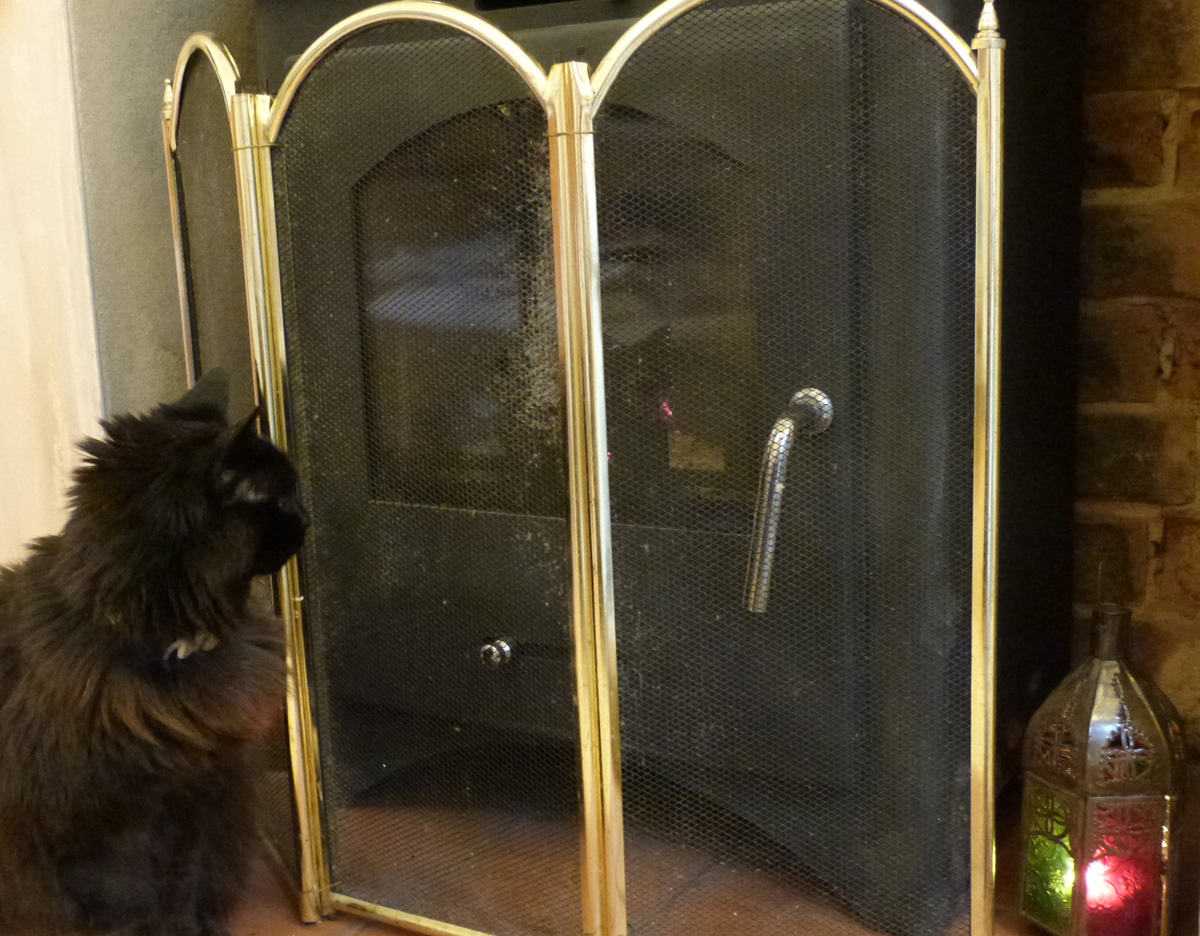
Anyway, to cut to the chase, it’s installed now. Mysteriously the room looks a whole lot bigger, and is quite a bit warmer even when it’s not lit, as the vicious draft has just died away now the chimney isn’t “open” all the time. But the first thing that happened was that our ex-feral feline friend took such a shine to the stove that she actually singed her tail, wanting to sit so close to it. A fire-guard or screen was called for…
There seems to be some impediment…
We had a little folding-screen fireguard for the brick-arch open fire. It wasn’t big enough or stable enough to discourage a heat-seeking feline missile from getting into the new enlarged opening. So I started to research fireguards & fire screens… oh dear! However have I lived this long without a bejewelled fireguard?! You could spend an absolute fortune and some of them are utterly gorgeous. I really, really fell for a candle-holding gothic triptych, which would have done the winter job perfectly well & looked stunning with the candles lit in summer too…sadly, it just wasn’t quite wide enough. And nothing was quite the right height, or the right shape, or the right colour.
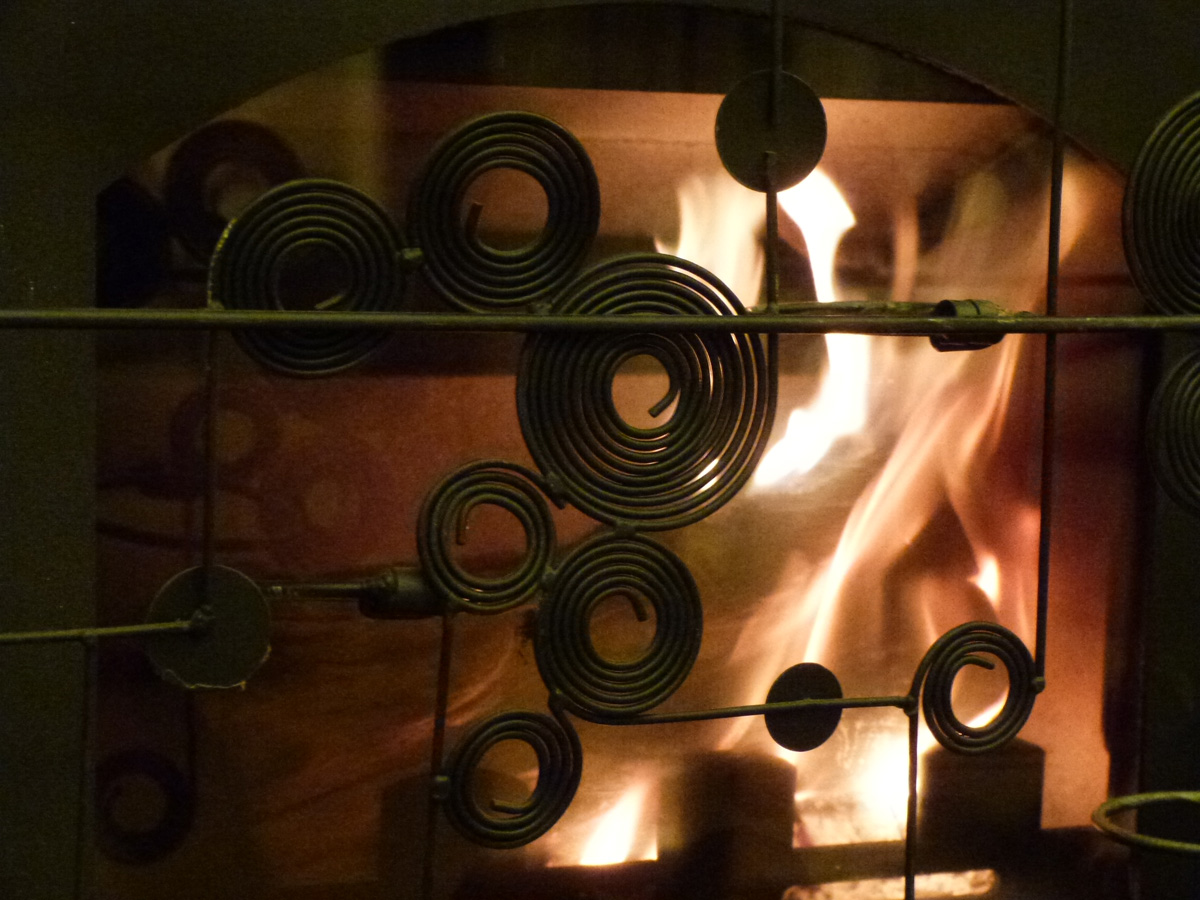
So I did what I always do in these tricky situations; I went down to the Tip and peered into the Metal skip. And there, bang on cue, were not one, but two candle screens… A bit of fishing with a long, strong hook and they were straight into my car ready for further duties. One, a brass one, is lovely but far too narrow, but the other, in black curly wire, was just about exactly the right height & width, and still had all its little glass candle holders intact, even after being thrown into the skip! They are both wall-hung panels, rather than fire screens, but it hasn’t been too hard to wire two of the folding panels from the old fireguard onto the sides so that it stand unsupported, fills the opening & is quite stable & pretty sturdy too. The brass one has gone for sale on my stall at Molly’s Den and should more than cover the price I paid for both of them.
Talk about serendipity; there’s something almost cosmic about the timing. I decide I really, really want a candle-screen, and lo & behold! A candle-screen that’s almost perfect for the job turns up, that very day. It’d be rude not to use it, wouldn’t it?
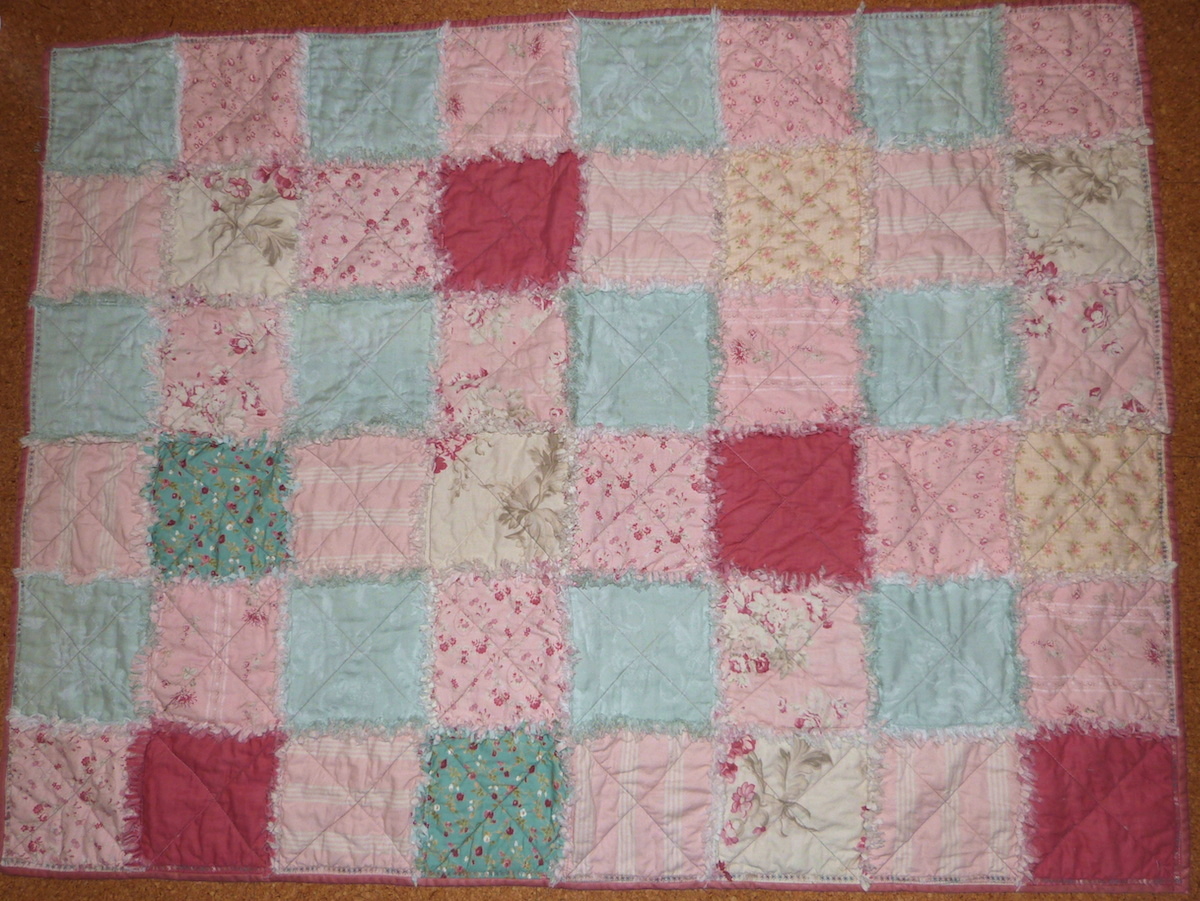
Recently a friend asked me whether I could make her a cot quilt for a baby girl. I’m no expert, but have made a few quilts now, and she’s just beginning to learn and didn’t feel confident enough yet to make one for a present. She didn’t need to twist my arm, although I have lots of other calls on my time just now; quilting is always a pleasure and a welcome retreat from the stresses & strains of everyday life. She wanted me to use new materials, and I happened to need to take a trip down west, so off I trotted to the lovely Becca’s Fabric Larder and ran riot with her budget. I need to point out here that making a quilt with new fabric of decent quality isn’t a cheap exercise; you can find fabric much cheaper, but will it stand up to the regular washing an item in constant use will get without shrinking or shredding? I actually prefer to use old, pre-used fabric, which is pre-shrunk and often of much higher quality than anything I can afford to use that’s available now. However, I do go to local quilt group stash-sales, and sometimes pick up bits other people haven’t used at affordable prices, and two of these fitted in with the other fabrics rather well, so they got used too.
Anyway, having over the last few years invested in some good-quality secondhand tools, after much patient watching, stalking & last-minute-bidding on Ebay, I was able to cut, piece, back, quilt & bind a 3′ x 4′ raggy quilt in a little over 4 days, alongside general family & business activities. Becca didn’t have the batting I wanted, but I was lucky enough to find a king-size portion online that someone else hadn’t used & was selling for less then half the price of buying new, including postage; it’ll do 4 cot quilts and a few bags too. And when it came to the binding, I wasn’t able to find anything ready-made that went with the fabrics I’d used. But at the market on Saturday, I was offered a deal I couldn’t refuse, by one of the house-clearance firms; three boxes, one containing filthy vintage handbags, one containing vintage clothes, and one of fabric scraps, for £10.
There are 15 high-quality leather handbags in the first box, including a Prada bag. Well worth cleaning up; they’ll earn that £10 back, and a fair bit more! Enough decent clothes in the second to keep me from clearing the clothes rails in my shed for a while, and in the third, some excellent fabric, including a length of pristine pure wool tweed, worth over £10 on its own. But what clinched the deal was spotting some dusky pink glazed cotton, just exactly the right colour to bind the quilt, easily enough to make a number of bias cuts. Imagine my surprise on getting it home and finding that there were two generous pieces, already cut on the diagonal – and two more blue pieces, cut just the same – they’d clearly come from a quilter’s stash! So I gathered my courage and cut my own binding; to my surprise it wasn’t hard, and I won’t be scared to do it next time. Anyway – quilt finished, washed, tumble-dried to fluff up the raggy bits, and handed over.
Raggy cot quilt
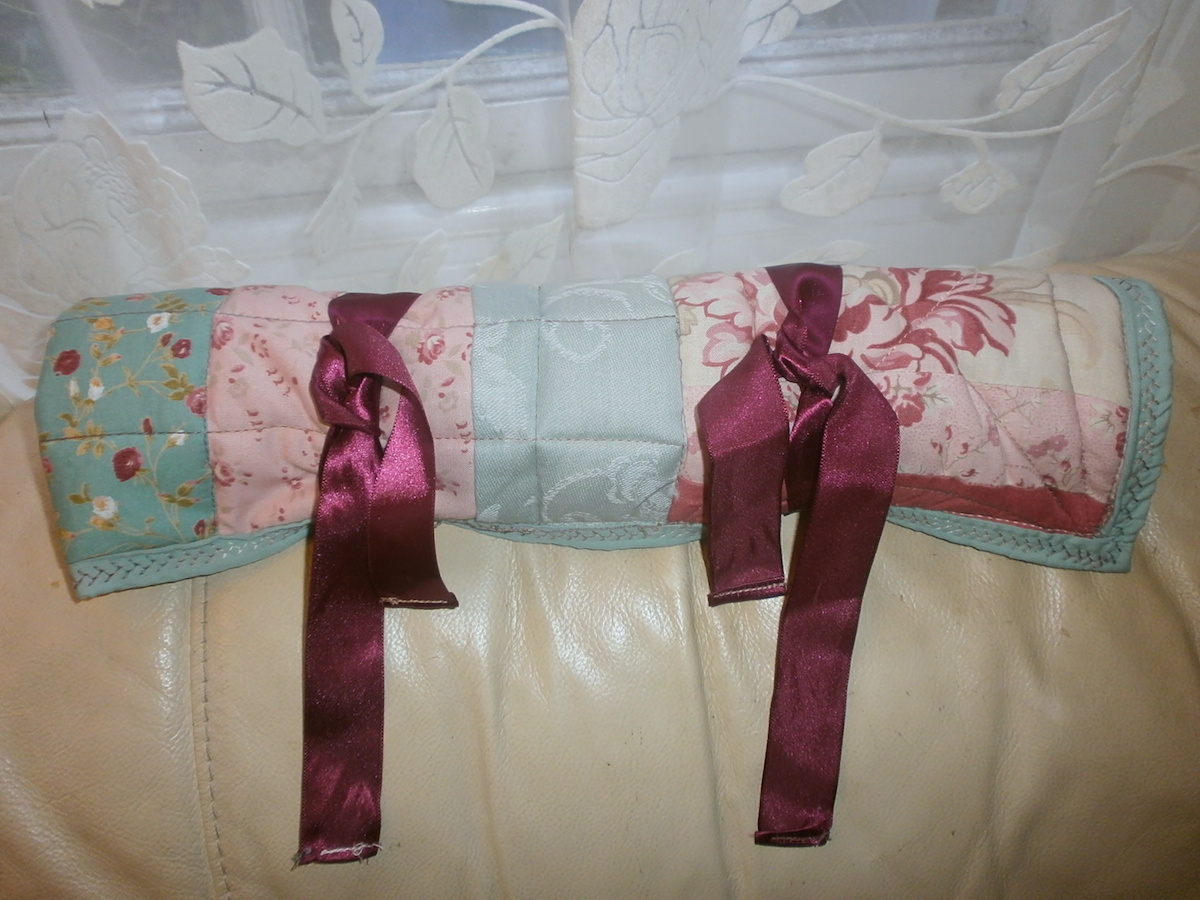
But there were bits left over… another friend had recently asked me to find her a knitting needle roll, and as she’s been kind enough to give us 3 beautiful budgies over the years, I thought I’d like to make her one to say thank-you. So the little left-over bits got themselves made up into this one:
Knitting needle roll pieced from small scraps
And then I realised that the friend who’d asked me to make the quilt had a birthday, the very day that I was handing the quilt to her! And she’s rather fond of yarncrafts too, so the bigger leftovers, along with a few other scraps, were whisked up into this one:
Big scrappy needle roll, with space for scissors, patterns etc.
So, I may have had to spend some money on all this (although it wasn’t actually my money anyway) but I have to say I’ve had so much fun with a few bits of fabric that in my mind, at least, it was money well-spent!
Once again it’s that time of year, when people leave perfectly good food lying around on their doorsteps for days, until it goes mouldy, then throw it away. We are a very strange race…
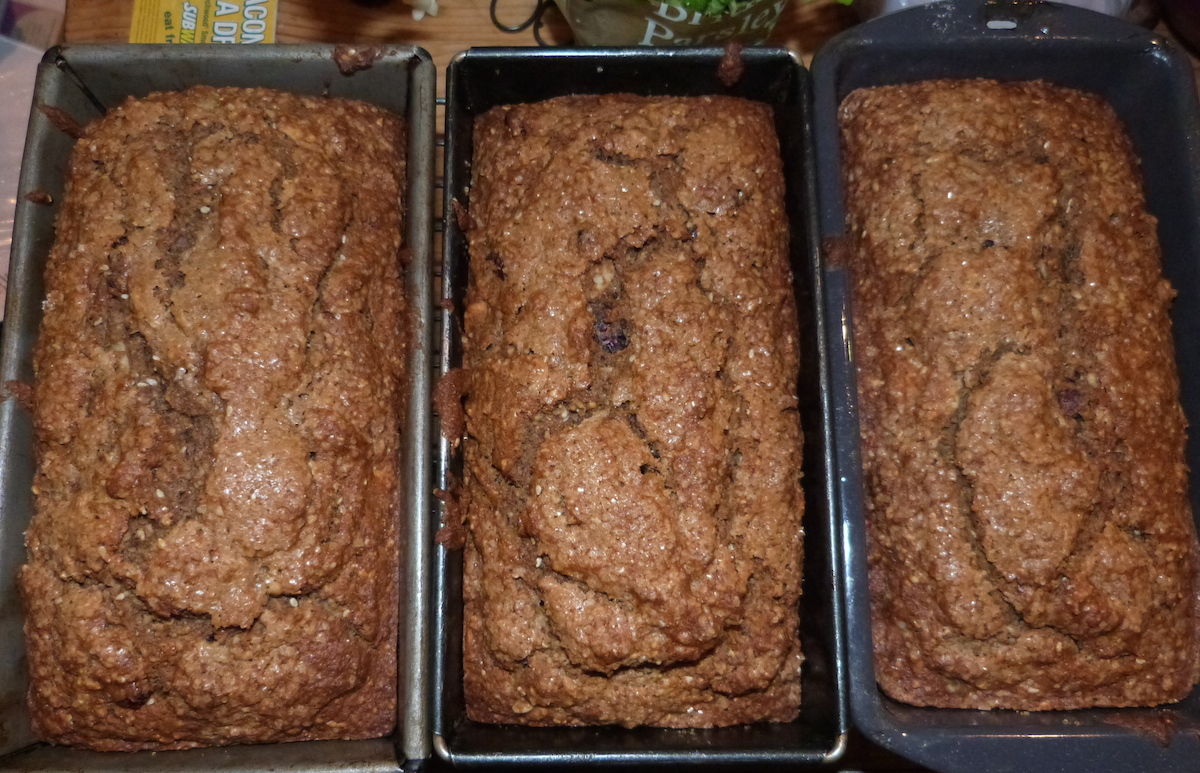
So here’s a link to a rather nice local story. It just so happens that Venus is a friend of mine, and we have been lucky enough to be given a portion of one of the heroic pumpkins in question. There’s a lot of good eating in a decent pumpkin & they’re “a good source of Vitamin E (Alpha Tocopherol), Pantothenic Acid, Magnesium, Phosphorus, Potassium and Copper, and a very good source of Dietary Fiber, Vitamin A, Vitamin C, Vitamin K, Iron and Manganese.” (Quoting from http://nutritiondata.self.com.) Most people I know have at least one good pumpkin recipe, usually Pumpkin Pie or soup, but there are plenty of others out there. Here’s one of my favourites, which makes 3 delicious loaves; one to eat, one to freeze, and one to share.
Spicy Pumpkin Bread:
Dry Ingredients:
4 cups of grain flour – I used 2 of spelt flour, 1 of fine oatmeal and 1 of cornmeal
2 cups sugar – my original recipe, an amalgam of 3 old ones, called for 3, but 2 works just as well if you ramp up the spice a little
1 tsp salt. Yes, it does make a difference.
2 tsps bicarb of soda
1 tsp each of nutmeg, cinnamon, allspice & ginger – you can play around with these quantities.
1 cup dried fruit – raisins, sultanas, cranberries, currants, cake fruits – whatever you’ve got.
1 cup nuts & seeds – pumpkin & sunflower seeds, flaked almonds, walnuts, pecans – any or all!
A sprinkle of demerara sugar.
Wet Ingredients:
2 cups cooked pumpkin – pressure-cooked or roasted, scraped clear of skin
1 cup oil
4 eggs
1 tsp vanilla
Method:
Set your oven to heat up to Medium/Gas Mark 4/160℃. Combine & mix the dry ingredients until lumps & clumps have gone. Mix the wet ingredients; a hand-whisk is fine. Combine wet & dry ingredients & stir well, then pour into 3 x 2lb loaf tins. Sprinkle with demerara sugar & cook for an hour, or until a wooden skewer comes out clean.
Freezes very well, makes a good on-the-hoof breakfast, and makes a great pudding served with cream or custard, as well as being very satisfying just served warm with a cup of tea.
And here’s a very off-the-cuff idea; when you’ve just nipped up to the shops for a tub of bicarb, and the heavens suddenly turn black & disgorge the opening volley of our annual monsoon, and you’ve left your hat on the kitchen table & your brolly in the umbrella stand, what do you do? You take the standard supermarket carrier bag you’d stuffed into your pocket, rip it open down one side, tie the two bottom corners together, pop it over your head with the knot at the top, and tie it by the handles at the back. Voilà! A have-a-go rainproof turban!
A quick whizz round the car boot sale at our local National Trust property this morning brought me this little treasure at a very reasonable price:
I know they’re not worth a fortune, as they were made in East Germany under communist rule, mostly in mass-production factories, and any of the traditional craftsman makers who may have been involved were not allowed to sign them. Many of them look very pretty but are too cracked or warped to play, or have loose pegs. But the only fault I can find with this one, now I’ve removed large amounts of dust & replaced a couple of the springs which had wandered off under the strings, is that it’s out of tune. It’s entirely possible that a harp-tuning wrench will do the job, and we just happen to have one of those in the house, as one of the offspring is currently learning to play the harp.
So, the dilemma is, sell it, or learn to play it? It’s a very pretty item & I have a feeling it would sell very fast, quite likely to someone who just wants it for its undeniable good looks. And I know that they are far from the best autoharp for new beginners. But – it’s the one I happen to have! And it’s something I’ve had a hankering to learn since I was in my late teens. I think I’ll have to give it a go…